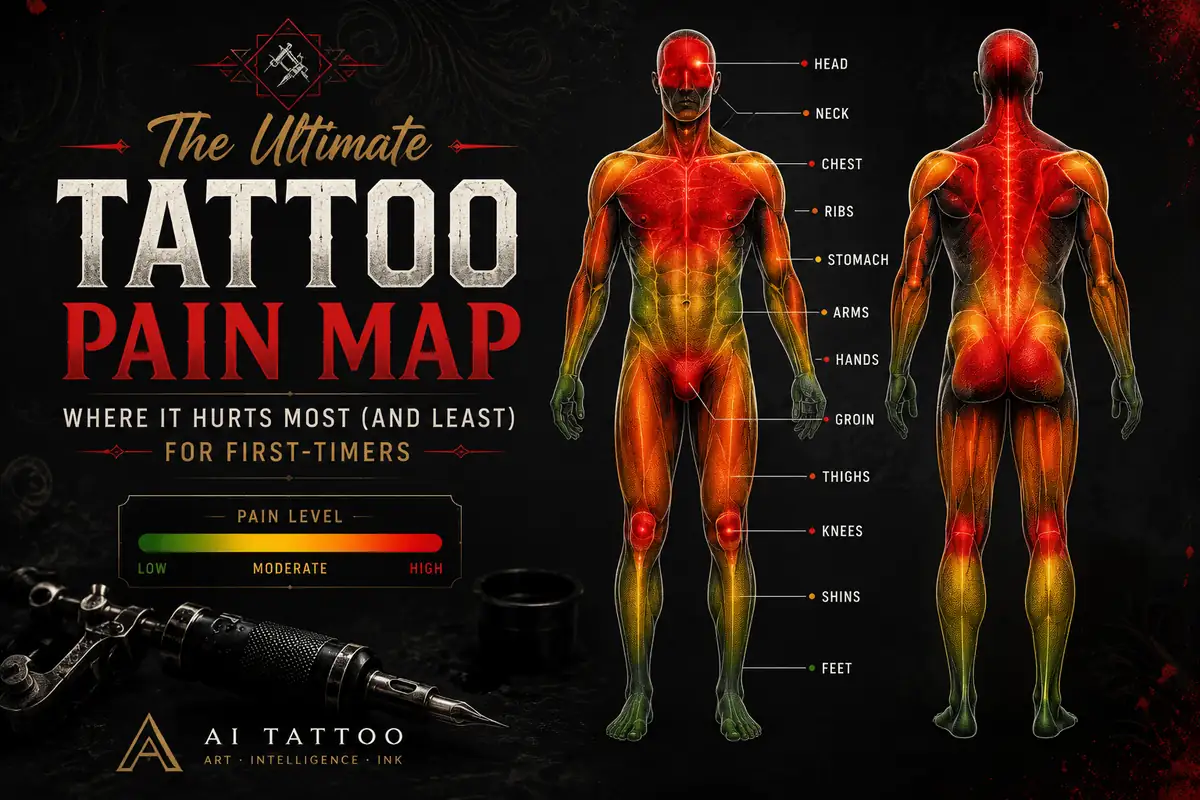
Getting your first tattoo is exciting, but it can also make even the calmest person quietly nervous. You’ve spent hours saving ideas, comparing styles, and imagining how that ink will look on your skin. Then the appointment gets closer, and one very normal question starts taking up space in your head: How much is this actually going to hurt?
Fear of pain is one of the most common reasons people delay getting their first piece of body art. Pain is personal, of course, but tattoo pain is not completely random. The human body has a map of biological "hot spots" where nerve endings are densely packed and the protective layer of fat and muscle is thin.
Understanding this anatomy of discomfort can help you choose your first tattoo placement with more confidence, so the day is memorable for the art, not just the nerves.
The Science of Tattoo Pain: What Does It Feel Like?
Before diving into the specific zones, it helps to understand what the physical sensation actually entails. A tattoo machine uses a grouping of tiny needles that cycle up and down rapidly, puncturing the epidermis (the outer layer of skin) to deposit ink into the dermis (the secondary layer) at a rate of 50 to 3,000 times per minute.
Most first-timers expect a deep, muscular ache like a medical injection, but the reality is quite different. The sensation is typically described as:
- A localized, intense cat scratch on a fresh sunburn.
- A continuous, hot vibration moving across the skin.
- A sharp, annoying pinch accompanied by a buzzing warmth.
The intensity fluctuates based on the type of linework. Crisp, thin outlines require concentrated needle groupings that can feel sharper, while heavy shading or color packing distributes the vibration across a larger area, which tends to feel more like a dull, burning sensation.
The "No-Go" Zones: Where It Hurts the Most
If you are a first-timer anxious about your pain tolerance, it is highly recommended to avoid the following areas for your very first piece. These regions share a common trait: they are close to major bones, packed with nerve clusters, and lack subcutaneous fat to absorb the needle vibrations.
1. The Ribcage and Sternum
The ribs and breastbone are widely recognized as some of the most challenging areas on the body to tattoo. The skin here is thin, and the needles vibrate directly against your bone structure. Every time you breathe, your chest expands and moves, making it harder to settle into a steady rhythm. The sensation here can feel like heat radiating across your torso.
2. The Armpit and Inner Bicep
While the armpit itself is rarely chosen for a first tattoo, the inner bicep is a popular yet deceptive area. The outer arm is famously easy to handle, but as the needle creeps inside toward the armpit, you enter a major highway of nerve endings. The skin here is soft, friction-sensitive, and prone to extreme swelling.
3. The Spine and Neck
Tattooing directly over the vertebrae sends intense, structural vibrations directly through your central nervous system. Many clients report that a spinal tattoo doesn't just hurt locally; it creates an uncomfortable radiating sensation that travels up to the base of the skull. The front and sides of the neck are similarly painful due to the delicate nature of the skin covering the windpipe and throat.
4. The Foot, Ankle, and Shin
The lower extremities are notoriously unforgiving. The shin bone and ankle bones have virtually zero fat insulation. When the needle strikes these areas, the vibration echoes through the bone, creating a distinct rattling sensation. Healing can also be tricky here due to blood pooling from standing, which extends the post-tattoo throbbing.
The Green Light Zones: Best Placements for Beginners
If you want a smooth, highly manageable introduction to body art, these "Green Light" zones offer thick skin, dense muscle tissue, and lower nerve density.
| Placement zone | Pain level | Why beginners usually handle it well | Best design fit |
|---|---|---|---|
| Outer forearm | 2-4 / 10 | Thicker skin, fewer nerve clusters, easy breathing position | Fine line, script, small realism, botanical pieces |
| Outer bicep | 3-4 / 10 | Muscle absorbs vibration and swelling is usually manageable | Traditional icons, animals, medium illustrative work |
| Outer thigh | 3-4 / 10 | Large muscle cushion and enough space for breaks | Larger florals, ornamental layouts, portrait references |
| Upper shoulder | 3-5 / 10 | Stable canvas with lower psychological stress because you are not watching the needle | Round designs, mandalas, shoulder caps |
1. The Outer Forearm and Outer Bicep
This is the gold standard for a first tattoo. The outer arm possesses a resilient layer of skin and plenty of underlying muscle or fat. Pain levels here rarely rise above a mild, irritating scratch. It is an ideal zone to gauge how your body responds to the adrenaline rush and endorphin crash of the tattooing process.
2. The Outer Thigh
The thighs offer a massive canvas with some of the thickest muscle tissue on the body. As long as you stay away from the highly sensitive inner thigh and the back of the knee, an outer thigh piece is remarkably comfortable. It can easily handle larger, highly detailed illustrative or realism concepts without overwhelming your nervous system.
3. The Upper Back and Shoulders
The fleshy area of the shoulder blade (scapula) and the upper back (avoiding the direct spine) is another fantastic, low-pain option. The skin is stable, and because you cannot actively look at the needle while it works, you eliminate a significant portion of the psychological anxiety that amplifies physical pain.
Psychological Factors: Mind Over Matter
Pain isn’t just biochemical; it is psychological. Your mental state walking into the studio dictates how your brain processes every single prick of the needle.
- The Anticipation Trap: Spending days reading horror stories online raises your cortisol levels. If you expect a 10/10 pain level, your brain will overreact to a 3/10 sensation.
- Visual Anxiety: Watching the needle strike your skin triggers a survival response that heightens sensitivity. If you feel nervous, look away, talk to your artist, or focus on a fixed point in the room.
Pro Tips to Minimize Discomfort on Tattoo Day
To make your session easier on your body, follow this preparation checklist:
- Hydrate the Skin from Within: Drink at least 2 liters of water daily for three days leading up to your session. Hydrated skin accepts ink much easier, reducing the number of passes the artist has to make over the same spot.
- Eat a Heavy Meal: Your blood sugar will drop drastically during a long tattoo session due to adrenaline production. Eat a complex-carbohydrate meal 2 hours before your appointment to avoid lightheadedness or shaking.
- Sleep is Your Armor: Do not stay up late the night before. Exhaustion strips away your mental resilience and lowers your natural pain threshold.
- Avoid Alcohol and Excessive Caffeine: Alcohol thins your blood, causing excess bleeding that pushes the ink back out, forcing the artist to work slower. Caffeine increases anxiety and elevates your heart rate.
Final Thoughts: Perfecting Your Concept Before the Needle
The kind of discomfort people remember longest is often not the needle; it is the regret of choosing a placement too quickly. If you are anxious about where to start, compare these beginner zones with our guide to how fine line and traditional tattoos age over time. A delicate design may look perfect on the forearm, while a bolder piece might need more room to breathe.
If you already know the placement you want, the next smart step is preparing a reference your artist can actually use. Our guide on how to talk to a tattoo artist walks through pricing, etiquette, and bringing AI mockups into a real consultation without making it awkward.
And once the tattoo is done, placement still matters. Areas with more friction can be harder to heal, so keep our day-by-day tattoo aftercare guide handy before your appointment.
Before booking an expensive consultation, use our advanced AI Tattoo Simulator. Simply upload a photo of your own arm, leg, or shoulder, and see exactly how your custom concept flows along your body's natural contours. By confirming your placement with 100% visual confidence beforehand, you eliminate the mental anxiety, leaving you relaxed, prepared, and ready to conquer the chair.
Preview the idea before you book ink
Use AI Tattoo Generator to turn your concept into a visual reference, then test placement on your own photo before talking with an artist.
Create Tattoo